Sunday, March 28, 2021

Cambridge Portfolio Week 7 3/28; Recording Problems

 I would like to talk about the problems that I have had during filming. Particularly, I want to talk about the time of day and the way it affected my filming.

When I had come up with the idea for this film having a yellowish tint, I forgot that there would be trees. These trees produce a lot of shade, and they make the film look less barren than I thought it would. Trees kind of make the shot look a bit more lively, which is not what I'm going for.


I said previously that I would film from 4-7, but that makes it too shady to film. Instead, I tried to do it from 12 to 2, and got better results.

Another problem outside is that there were cars. Sometimes cars would move in the background, sometimes people, and sometimes scenes would be inconsistent since a car that was there before wouldn't be there after.

For example, in this video I had to cut off a bit because a car was coming in the background. Also, there was a very bright truck with people moving in the background that would not go away, so I had to film it somewhere else away from my house.

I am almost done filming, I need 1-2 days to finish and I can use the rest of the week to edit, which won't take a while. Once I am finished editing, I can work on my reflection for my remaining time and submit it.


Cambridge Portfolio Week 7 3/28; My Recorded Clips

 Hello, over the the course of this Spring Break, I have made major strides in my filming process. I have completed most of the filming and am almost ready to compile and do some changes. I am not yet done, but I have done most of the necessary scenes that would require a lot of setup. I would like to discuss some scenes and how I did them, what problems I had, etc. 


I'd like to start with the stairs scene. This is probably my favorite iteration since I got the light just the way I wanted it, but it just had this strange eyeroll I did for some reason. I was thinking about cutting it out but it wouldn't be natural. I don't think it'll make much of a difference. Also, this version has been edited to have a warm color scheme


Here's another attempt I did, except at night. I did this before the one above, and I realize that it would have been better if it was better during day, because there was a window above that would provide enough lighting to see me, but not enough to ruin the dark lighting. It's also a bit easy to tell it's at night, and the light on the left, which is supposed to be from the windows, looks very artificial.


 Here, I did not apply the warmer color scheme, and it was also very dark. For those reasons I did want to use it.


This video isn't cropped yet to make way for the finished film. It does not have the warm yellow tint applied. The cameraman pans over when I audibly snap, but fortunately the sound will be cut out in this part.


This is the first shot of the film. It is quite shaking and not as zoomed in as I'd like, but I did a quick edit on iMovie.

In iMovie, there is an anti-shaking filter, and I think it looks pretty good. There's still a bit but it definitely looks more professional than it did before.

They aren't exactly turning out like I thought they would in my head, but I'm an ambitious person and am not a master filmer. I think they're decent, and I hope that they look good after editing.


Saturday, March 27, 2021

Cambridge Portfolio Week 7 3/27, Finger Prop

Hello, welcome to Week 7 of my Cambridge Portfolio project. The reason for my lack of posts this week is because I've been hard at work. I was planning on doing my blog as I went by, but there were setbacks and it was not easy to work consistently and compile enough info for each respective blog.

In this post I'll discuss the process behind a finger prop I did for the film.

I started with the glue process I previously found online. I put on 4-6 coats of glue, but it was very time consuming, and it only ended up cracking. Then, I tried using a hairdryer to speed up the drying process for each coat.

It didn't tear, but it was difficult to get off. I ended up not using this method. I don't know if I didn't powder my hand enough to prevent sticking, or if it just wasn't a good method, but I opted to try another.
What I ultimately went with is using a wax mold.
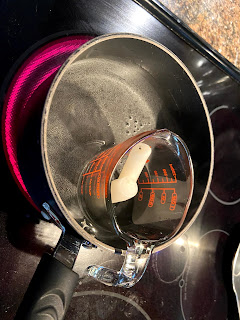
I started with melting a candle in a cup using boiling water. It took a while, but it finally melted.
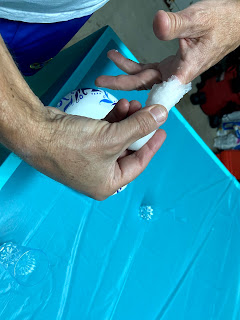
I tried putting in my fingers, but it really hurt to put my finger in scalding hot wax, so my dad helped out.
It wasn't really painful for him, so after covering his entire finger, we went into the garage and got some Easy Sand to make a cement/clay mixture that would harden up.
We carefully pulled out the finger and put it in a small plastic cup.
We mixed together the sand with water and made a clay-like mixture.
We initially tried putting it into a glove to see if it would turn out well, and it did. It broke easily though, so we needed to be careful later.
We poured in the clay and waited for it to dry.

After waiting overnight, it was hardened.
We tried shipping it off, starting with the exposed area, but it was too hard.
Instead, we cut some off with a knife and sliced bigger lines so we could safely take off bigger chunks.
This is how the finger turned out.

I got some acryllic paints and painted the finger. I mixed some colors and did a light coat.

 However, it was a bit too pale, so I lightly and gingerly rubbed black paint on to to make it look dirtied and more convincing. This is the final product.

I think me and my father did a good job on the finger. It's not extremely convincing, but for something that was made from scratch without a big team, I think it looks good. It may have been a bit too much work for one shot, but it's always something I can reflect back on and it was fun to make.

Sunday, March 21, 2021

Cambridge Portfolio Week 6 3/21, Props

 Hello, now that I will continue filming this Spring break, I need to figure out how I will create the human remain props such as the finger, ear, eye, and tooth. I previously said I would likely use EVA foam to sculpt it, but after looking at the foam I had it was simply too thin and difficult to work with to create props like a finger. I believe EVA foam was made for bigger things like suits of armor and not for tinier things like the ear. I have tried to do some research on how I can create props for use in my film opening.

The finger doesn't seem nearly as difficult as I thought it would, but it still isn't that simple. The girl in this video uses layers of glue to create a finger, and it looks pretty convincing. I have the materials to create this, so I'll probably try this one.

https://www.wikihow.com/Make-a-Fake-HandImage titled Make a Fake Hand Step 10

This wikihow post shows how to create a fake hand. I only need the finger, so I might either do what they do just for the finger, or do the entire hand and have multiple finger props, which may be handy if one gets lost or broken. They utilize a paper plate, clay, and a rubber mold. I only have paper plates, however.


Realistic Eyeballs: Tutorial by Terra Lair | Halloween forum, Halloween  inspiration, Halloween props

For the eyeball, I think it will be the easiest. I could paint a bouncy ball white, paint some red lines, and paste a photo-realistic iris. I have spray paint that can make it shiny, so it doesn't look that fake.

As for the tooth and ear, the tooth is the one thing that cold be sculpted with EVA foam but I can't figure out the ear.

If these don't work, my last resort is Photoshop. Since the shots of these body parts are pretty static, I could just edit in a picture of them. For now, I plan on starting to sculpt them tomorrow before doing some filming.

Cambridge Portfolio Week 6 3/21, Order of Filming/Schedule

Now that I will film most of my opening this week, I need to plan the order in which I film scenes and when I will. I have done some type of scheduling before, but it has not gone according to plan. After attempting to film the first scene of the film, I realized it was very difficult and may need some refilming, not to mention it wasn't the entirety of the scene. If I'm going to refilm any of it, it will be the end. I'm trying to do the easy parts first, so that I can finish filming as fast as possible. Something I need to consider is simply the fact that I would like to enjoy my break. If I try to spend the entirety of the break doing it, I fear that I would be too burnt out and do worse on the project than I would otherwise. For the hours, I plan on doing it from 3:00 to 7:00. The reason is because I want it to be bright enough and to be consistent. It would be noticeable if I did different scenes at completely different times of the day because of the lighting and the way shadows are cast. From these hours, I would preferably do it later, because it would at to the orange and yellow filter I plan on editing in.

I believe I should start with the scene in which the character goes down the stairs. The reason is because it's a pretty simple shot and the part with the light going through the windows could be shot earlier in the morning where the sun comes up in that direction, and the interior of the house it dark. I could probably try getting up early on Monday or Tuesday. Next would be the outside walk, because it doesn't require any kind of setting up. There are no props or set design I really need. Next would be the shot outside and inside the other houses, which would be harder since I am filming it inside someone else's house and need to create the eyeball. Finally, I would probably go with the scenes where I find human remains as well as the entity attack, which would be more difficult since they require prop creation. This is only assuming that I do not refilm the first scene, which is the most difficult since I need to trash the room. I cannot decide exact dates for these scenes, except for the eyeball scene on Friday, since I actually plan on going to a friend's house on that date. I look forward to filming this Spring Break.

Cambridge Portfolio Week 6 3/21, Spring Break

 Hello, welcome back to my Cambridge Portfolio blog. I know that I have not posted any blogs for the entire week, but that's because it has been the last week of the quarter. Since grades would be closing I needed to put all my effort in so that my grades would not change at the last moment. This does not mean I have not made any progress at all, however; I have continued my planning. In this post I'd like to talk about spring break. Fortunately, this is the only thing I have to work on for the entire break, so I have all the time I need. However, I currently have some cousins that are visiting, so that limits the time I have. I plan on finishing at least three fourths of the filming.

Some things that I can work on with my cousins over are the props. I have some leftover EVA foam from a cosplay I did, which I can used to sculpt the body parts from the film. I may even get help from my cousins. My mindset for the rest of the project is that if I can't film, I need to find something else that I can work on. I need to do most of the filming this week because I also need to save time for my editing and reflection. I haven't been able to do enough work for the past few weeks, so I need to put in the time I have this week.

Sunday, March 14, 2021

Cambridge Portfolio Week 5 3/14, Beginning of Filming Part 2

Before I had talked about plans and issues with the filming, but in this post, I would like to get into the actual videos themselves. After setting the set I got my dad to help with some filming, but I wish it could have gone better. Here are some example scenes of multiple takes I did.


In case I wanted to edit the film's speed, I filmed it at 60 frames per second rather than the standard 30.
I did a small change here, I decided to do a higher shot of the character standing up and then pan over to the wreckage. I figured dark lighting and me being in frame would not cover it enough.

I tried some darker lighting here, so that it would hide the background a bit more before the next shot.


After doing some shooting, I decided they simply didn't turn out the way I would like them to. I'm glad I tried this first because now I know how hard this scene would be to shoot, and I will either have to accept some of my footage or reshoot it later. Other scenes such as the ones outside are probably easier to get footage of. I don't need to do every shot in chronological order.

I am disappointing I was not able to do a lot this week, but now that I when beyond a simple prototype film and tried to do some real shooting I realize that this film will not be as easy as I initially thought it would be. I need to dedicate some more time into it and try to schedule the order of scenes I should shoot to make the filming process as smooth as I can.


Cambridge Portfolio Week 5 3/14, Beginning of Filming

 Hello, previously I had set up the set for my first scene. Today I would like to talk about some film planing and some progress I've made in the set.

Here is a picture I used for reference to get a good angle. Here I realized the lighting was too strong, which I likely couldn't even fix with post-editing.
 

Here is a makeshift tool I used that I plan on using for a shots of the character looking at the room, where a bit of light peeks from the blinds. Due to filming schedules I cannot film in the room early enough for sunlight to get in, so I improvised.

Examples using a flashlight to see how it would look. It looks too white, but it can be fixed in editing.

I have done a bit of filming, but I have taken many shots and can't really choose yet before putting them together. The problem in this scene is lighting; it's a bit too bright but it's difficult for me to balance being able to see the character and hiding the background. I don't know if I'll have to refilm another day. The main issue is that this is a part of my house I use frequently and I cannot keep it trashed, but it's also inconvenient to keep on trashing it, and if I did I would need to position everything the same or else there would be continuity errors.


Example of lighting issue. I did not want to see a whole lot of the background before the character gets up, and you can see a strange reflection of the blinds.


Saturday, March 13, 2021

Cambridge Portfolio Week 5 3/13, Set Design

Hello, welcome to week 5 of my Cambridge portfolio project. I have previously finished my storyboard and have started production. I started with the first scene, in which the character wakes up in an unknown place. This is probably the hardest set to build because I needed to deliberately trash the room. Here are some examples of the process for creating my set.

This is how the room initially looked like.

This is the finished product.
 
Original concept for reference


I took apart the couch and threw the pillows around. Then, I gently put down the chairs but positioned them to look like they were thrown.
 
 I got some foam rods that were lying around and strewed them around.
 
I gingerly put down my computer monitor and leave the mouse and keyboard hanging off the table.
 
 
I got a nearby plastic plant and dropped it near the corner.
 
After looking farther away, these parts were not visible due to the plant and you could see an empty spot in the corner, so I pushed them a bit farther away.


For the more delicate parts of the set or things that could damage the floor, such as the computer, I unfortunately decided to play it safe and just put it down gently. I could understand a bigger company probably being more reckless because they have a budget or even having the resources to build their own broken monitor prop, but I decided to just to keep it simple, as it didn't really damage the fidelity of the set anyways. Lighting was also a bit of a problem since the daylight was getting darker, but I opted to let editing to do some of the lighting work; the only light I needed was a clear light source and enough to be able to see the character. This is the set that I'll be doing my filming on, which I will post soon once I am finished filming.


Sunday, March 7, 2021

Cambridge Portfolio Week 4 3/7, Storyboard

 Hello, here is my storyboard. A few things have been altered, but 99% the same thing as before.


Cambridge Portfolio Week 4 3/7, Film Prototype

New Plans

Hello, welcome to my second Cambridge Portfolio Blog of the week. This has been ready for posting for a bit, but due to some complications I have had to do it later. I have been working on my storyboard, but before I go any further on how exactly I envision this project, I decided to do a small rough film of a part of my storyboard, and I'm glad I did.


I realized that filming these shots was very difficult. You can see some poor lighting, and me struggling to keep the film steady and keep myself in frame. This means I need to take a different approach to the film. Since I now know I cannot do this by myself, I will enlist the help of my father to help me film. Another thing I have realized is that I do not have a dolly used in professional films, so even if I do have the help of another person, I will probably have to use post-production editing to remedy any shaking.

What this has taught me is that I need to think forward a little bit more, since writing something down or drawing it might sound good on paper, but not necessarily good in execution as shown in the video. This does not mean I will scrap my storyboarding, but I will need to film it differently.


Saturday, March 6, 2021

Cambridge Portfolio Week 4 3/6, Set and Costume Design

 Hello, this is Week 4 of my Cambridge Portfolio Blog. I have not made any posts for the past week due to an amount of work and that I have been working on my storyboard. I will not be posting the full storyboard just yet, as I am not finished. I will talk about the other decisions I have made regarding my project such as the costume and set design. Here is an example page from my storyboard below. It is rough, but it will serve as a reference during filming.


https://cdn.discordapp.com/attachments/536041755397586948/817956632449253396/IMG_7533.JPG 


For the set design, I have discussed this in minor detail. The shots take place in my house, a friend's house, and outside. The outside will remain somewhat untouched, since I am unable to do much physically since it is a public neighborhood. Despite the strange contrast am using this to my advantage by placing a look of confusion on the character's face as he sees the outside eerily normal, apart from the body parts he discovers on the ground. Despite the somewhat normal exterior the yellowish filter I have talked about before will convey that something is wrong. For the body parts, I will likely either edit them in digitally for the static shots, or create them myself, likely out of EVA foam. EVA foam is a soft material that you can cut and then mold when you use a heat gun. This may work for things like fingers or nails, though I may have to use something else for the eye, perhaps a painted ping pong ball.

For the character design, I only need to design a character for myself. The character in the film is unremarkable, simply sporting a T-shirt and shorts. The reason I am making strange contrasts is to make viewers ask questions. It adds a surreal nature to the opening, as though he suddenly manifested out of nowhere in this suburb. Whether or not this has any reason is up to the audience. The contrasts are both products of a lack of resources and real scene development. I use them to my advantage instead of simply calling off the film concept entirely because of a few errors. These are the plans I have for my set and character design, and I will finish up my storyboard to post it. Afterwards, I might ask friends or even peers for feedback.